机器学习——Day 1 数据预处理
原标题:机器学习——Day 1 数据预处理
原文来自:博客园 原文链接:https://www.cnblogs.com/hidari26/p/10923822.html
由于某些原因开始了机器学习,为了更好的理解和深入的思考(记录)所以开始写博客。
学习教程来源于github的Avik-Jain的100-Days-Of-MLCode
英文版:https://github.com/Avik-Jain/100-Days-Of-ML-Code
中文翻译版:https://github.com/MLEveryday/100-Days-Of-ML-Code
本人新手一枚,所以学习的时候遇到不懂的会经常百度,查看别人的博客现有的资料。但是由于不同的人思维和写作风格都不一样,有时候看到一些长篇大论就不想看,杂乱不想看(实力懒癌患者+挑剔)。看到别人写的不错的就不想再费时间打字了,所以勤奋的找了自认为简洁明了的文章分享在下面,希望能帮助到大家。
注意这是一篇记录博客,非教学。

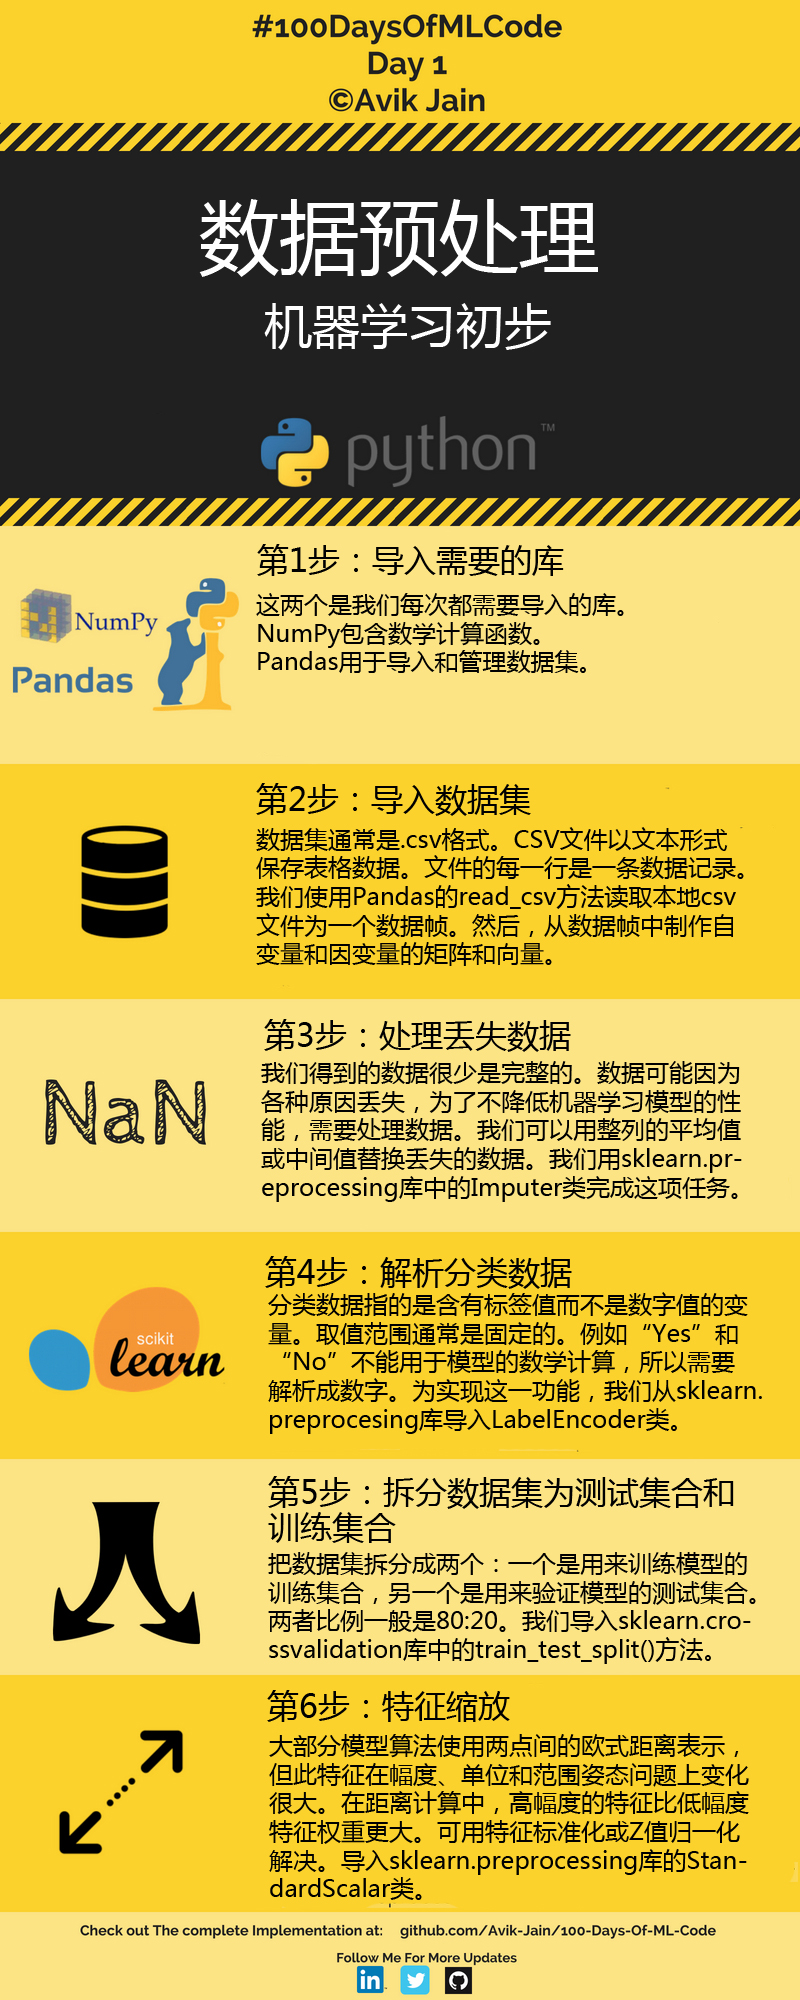
这两个是我们每次都需要导入的库。NumPy包含数学计算函数。Pandas用于导入和管理数据集。
#Step 1: Importing the librariesimport numpy as npimport pandas as pd
数据集通常是.csv格式。CSV文件以文本形式保存表格数据。文件的每一行是一条数据记录。我们使用Pandas的read_csv方法读取本地csv文件为一个数据帧。然后,从数据帧中制作自变量和因变量的矩阵和向量。
#Step 2: Importing datasetdataset = pd.read_csv('Data.csv')
X = dataset.iloc[ : , :-1].values
Y = dataset.iloc[ : , 3].valuesprint("Step 2: Importing dataset")print("dataset")print(dataset)print("X")print(X)print("Y")print(Y)
--------out---------Step 2: Importing dataset dataset Country Age Salary Purchased 0 France 44.0 72000.0 No1 Spain 27.0 48000.0 Yes2 Germany 30.0 54000.0 No3 Spain 38.0 61000.0 No4 Germany 40.0 NaN Yes5 France 35.0 58000.0 Yes6 Spain NaN 52000.0 No7 France 48.0 79000.0 Yes8 Germany 50.0 83000.0 No9 France 37.0 67000.0 Yes X [['France' 44.0 72000.0] ['Spain' 27.0 48000.0] ['Germany' 30.0 54000.0] ['Spain' 38.0 61000.0] ['Germany' 40.0 nan] ['France' 35.0 58000.0] ['Spain' nan 52000.0] ['France' 48.0 79000.0] ['Germany' 50.0 83000.0] ['France' 37.0 67000.0]] Y ['No' 'Yes' 'No' 'No' 'Yes' 'Yes' 'No' 'Yes' 'No' 'Yes']
iloc表示取数据集中的某些行和某些列,逗号前表示行,逗号后表示列,这里表示取所有行,列取除了最后一列的所有列,因为列是应变量
我们得到的数据很少是完整的。数据可能因为各种原因丢失,为了不降低机器学习模型的性能,需要处理数据。我们可以用整列的平均值或中间值替换丢失的数据。我们用sklearn.preprocessing库中的Imputer类完成这项任务。
我们可以看到矩阵X中还包含一些缺失数据(例如:4行2列),舍弃整行或整列包含缺失值的数据很可能是有价值的数据,所以处理缺失数值的一个更好的策略是从已有数据中推断出缺失的数值。
Imputer类提供了估算缺失值的基本策略,使用缺失值所在的行/列中的平均值、中位数或者众数来填充。这个类也支持不同的缺失值编码
#Step 3:Handling the missing datafrom sklearn.preprocessing import Imputer
imputer = Imputer(missing_values = "NaN", strategy = "mean", axis = 0)
imputer = imputer.fit(X[ : , 1:3])
X[ : , 1:3] =imputer.transform(X[ : , 1:3])print("--------out---------")print("Step 3: Handling the missing data")print("X")print(X)
--------out---------Step 3: Handling the missing data X [['France' 44.0 72000.0] ['Spain' 27.0 48000.0] ['Germany' 30.0 54000.0] ['Spain' 38.0 61000.0] ['Germany' 40.0 63777.77777777778] ['France' 35.0 58000.0] ['Spain' 38.77777777777778 52000.0] ['France' 48.0 79000.0] ['Germany' 50.0 83000.0] ['France' 37.0 67000.0]]
sklearn.preprocessing.Imputer(missing_values=’NaN’, strategy=’mean’, axis=0, verbose=0, copy=True)
主要参数说明:
missing_values:缺失值,可以为整数或NaN(缺失值numpy.nan用字符串‘NaN’表示),默认为NaN
strategy:替换策略,字符串,默认用均值‘mean’替换
①若为mean时,用特征列的均值替换
②若为median时,用特征列的中位数替换
③若为most_frequent时,用特征列的众数替换
axis:指定轴数,默认axis=0代表列,axis=1代表行
copy:设置为True代表不在原数据集上修改,设置为False时,就地修改,存在如下情况时,即使设置为False时,也不会就地修改
①X不是浮点值数组
②X是稀疏且missing_values=0
③axis=0且X为CRS矩阵
④axis=1且X为CSC矩阵
statistics_属性:axis设置为0时,每个特征的填充值数组,axis=1时,报没有该属性错误
imputer.fit()
imputer 实例使用 fit 方法,对特征集 X 进行分析拟合。拟合后,imputer 会产生一个 statistics_ 参数,其值为 X 每列的均值、中位数、众数。
imputer.transform()
使用 imputer 的 transform 方法填充 X 的值,并重新赋值给 X。
英文说明:https://scikit-learn.org/stable/modules/impute.html#impute
分类数据指的是含有标签值而不是数字值的变量。取值范围通常是固定的。例如"Yes"和"No"不能用于模型的数学计算,所以需要解析成数字。为实现这一功能,我们从sklearn.preprocessing库导入LabelEncoder类。
#Step 4: Encoding categorical data
from sklearn.preprocessing import LabelEncoder,OneHotEncoder
labelencoder_X = LabelEncoder()
X[ : , 0] = labelencoder_X.fit_transform(X[ : , 0])
print("--------out---------")
print("Step 4: Encoding categorical data")
print("X")
print(X)
--------out---------Step 4: Encoding categorical data
X
[[0 44.0 72000.0]
 [2 27.0 48000.0]
 [1 30.0 54000.0]
 [2 38.0 61000.0]
 [1 40.0 63777.77777777778]
 [0 35.0 58000.0]
 [2 38.77777777777778 52000.0]
 [0 48.0 79000.0]
 [1 50.0 83000.0]
 [0 37.0 67000.0]]
sklearn.preprocessing.LabelEncoder说明请参考:https://blog.csdn.net/kancy110/article/details/75043202
英文说明:https://scikit-learn.org/stable/modules/generated/sklearn.preprocessing.LabelEncoder.html
#Creating a dummy variableonehotencoder = OneHotEncoder(categorical_features = [0])
X = onehotencoder.fit_transform(X).toarray()
labelencoder_Y = LabelEncoder()
Y = labelencoder_Y.fit_transform(Y)print("--------out---------")print("Step 4: Encoding categorical data")print("X")print(X)print("Y")print(Y)
--------out---------X [[1.00000000e+00 0.00000000e+00 0.00000000e+00 4.40000000e+01 7.20000000e+04] [0.00000000e+00 0.00000000e+00 1.00000000e+00 2.70000000e+01 4.80000000e+04] [0.00000000e+00 1.00000000e+00 0.00000000e+00 3.00000000e+01 5.40000000e+04] [0.00000000e+00 0.00000000e+00 1.00000000e+00 3.80000000e+01 6.10000000e+04] [0.00000000e+00 1.00000000e+00 0.00000000e+00 4.00000000e+01 6.37777778e+04] [1.00000000e+00 0.00000000e+00 0.00000000e+00 3.50000000e+01 5.80000000e+04] [0.00000000e+00 0.00000000e+00 1.00000000e+00 3.87777778e+01 5.20000000e+04] [1.00000000e+00 0.00000000e+00 0.00000000e+00 4.80000000e+01 7.90000000e+04] [0.00000000e+00 1.00000000e+00 0.00000000e+00 5.00000000e+01 8.30000000e+04] [1.00000000e+00 0.00000000e+00 0.00000000e+00 3.70000000e+01 6.70000000e+04]] Y [0 1 0 0 1 1 0 1 0 1]
sklearn.preprocessing.OneHotEncoder说明请参考:https://blog.csdn.net/kancy110/article/details/75003582
英文说明:https://scikit-learn.org/stable/modules/generated/sklearn.preprocessing.OneHotEncoder.html
把数据集拆分成两个:一个是用来训练模型的训练集合,另一个是用来验证模型的测试集合。两者比例一般是80:20。我们导入sklearn.model_selection库中的train_test_split()方法。
#Step 5:Splitting the datasets into training sets and Test setsfrom sklearn.model_selection import train_test_split
X_train, X_test, Y_train, Y_test = train_test_split( X , Y , test_size = 0.2, random_state = 0)print("--------out---------")print("Step 5: Splitting the datasets into training sets and Test sets")print("X_train")print(X_train)print("X_test")print(X_test)print("Y_train")print(Y_train)print("Y_test")print(Y_test)
--------out---------Step 5: Splitting the datasets into training sets and Test sets X_train [[0.00000000e+00 1.00000000e+00 0.00000000e+00 4.00000000e+01 6.37777778e+04] [1.00000000e+00 0.00000000e+00 0.00000000e+00 3.70000000e+01 6.70000000e+04] [0.00000000e+00 0.00000000e+00 1.00000000e+00 2.70000000e+01 4.80000000e+04] [0.00000000e+00 0.00000000e+00 1.00000000e+00 3.87777778e+01 5.20000000e+04] [1.00000000e+00 0.00000000e+00 0.00000000e+00 4.80000000e+01 7.90000000e+04] [0.00000000e+00 0.00000000e+00 1.00000000e+00 3.80000000e+01 6.10000000e+04] [1.00000000e+00 0.00000000e+00 0.00000000e+00 4.40000000e+01 7.20000000e+04] [1.00000000e+00 0.00000000e+00 0.00000000e+00 3.50000000e+01 5.80000000e+04]] X_test [[0.0e+00 1.0e+00 0.0e+00 3.0e+01 5.4e+04] [0.0e+00 1.0e+00 0.0e+00 5.0e+01 8.3e+04]] Y_train [1 1 1 0 1 0 0 1] Y_test [0 0]
train_test_split()方法说明请参考:https://www.cnblogs.com/bonelee/p/8036024.html
大部分模型算法使用两点间的欧氏距离表示,但此特征在幅度、单位和范围姿态问题上变化很大。在距离计算中,高幅度的特征比低幅度特征权重更大。可用特征标准化或Z值归一化解决。导入sklearn.preprocessing库的StandardScalar类。
#Step 6: Feature Scalingfrom sklearn.preprocessing import StandardScaler
sc_X = StandardScaler()
X_train = sc_X.fit_transform(X_train)
X_test = sc_X.transform(X_test)print("--------out---------")print("Step 6: Feature Scaling")print("X_train")print(X_train)print("X_test")print(X_test)
--------out---------Step 6: Feature Scaling X_train [[-1. 2.64575131 -0.77459667 0.26306757 0.12381479] [ 1. -0.37796447 -0.77459667 -0.25350148 0.46175632] [-1. -0.37796447 1.29099445 -1.97539832 -1.53093341] [-1. -0.37796447 1.29099445 0.05261351 -1.11141978] [ 1. -0.37796447 -0.77459667 1.64058505 1.7202972 ] [-1. -0.37796447 1.29099445 -0.0813118 -0.16751412] [ 1. -0.37796447 -0.77459667 0.95182631 0.98614835] [ 1. -0.37796447 -0.77459667 -0.59788085 -0.48214934]] X_test [[-1. 2.64575131 -0.77459667 -1.45882927 -0.90166297] [-1. 2.64575131 -0.77459667 1.98496442 2.13981082]]
有关StandardScaler的transform和fit_transform方法
欢迎评论中提问,相关问题将在此更新!
免责声明:本文来自互联网新闻客户端自媒体,不代表本网的观点和立场。
合作及投稿邮箱:E-mail:editor@tusaishared.com
下一篇:Relu的缺点
热门资源

Python 爬虫(二)...
所谓爬虫就是模拟客户端发送网络请求,获取网络响...

TensorFlow从1到2...
原文第四篇中,我们介绍了官方的入门案例MNIST,功...

TensorFlow从1到2...
“回归”这个词,既是Regression算法的名称,也代表...

TensorFlow2.0(10...
前面的博客中我们说过,在加载数据和预处理数据时...

反向传播是什么?
深度学习系统能够学习极其复杂的模式,它们通过调...
智能在线
400-630-6780
聆听.建议反馈
E-mail: support@tusaishared.com
